The club got finished with the strategic move surprisingly fast during Wednesday. Rick (on far right of photo below) made a move south with cavalry and light troops to take Corinth. The Confederates stymied this move with troops coming from just the east of Corinth setting the stage for a battle in Corinth. (Del in purple sweater made the move with the Confederate forces.) Click on pictures for larger images.

Strategic move sets the stage for battle
This was an even up fight of two infantry brigades each and one cavalry unit. A fair fight in numbers the Confederate cavalry commander was JEB Stuart though. Simple game of three objectives and loses determining the victor. On the picture below the objectives for the battle the field closes in the picture, the hilltop above it and the white building representing Corinth.

Del, Rick and Ben study the battlefield
Both sides set up 6 inches onto the table to start the battle with Ben and Rick the Union commanders and myself and Kon the Confederate commanders. As the Confederate commanders Kon and I tried to cover all the objectives with Kon commanding one infantry brigade and the battery of guns and I the other brigade and the cavalry unit. I expected the Union forces to make for Corinth and the hill and boy was I wrong.

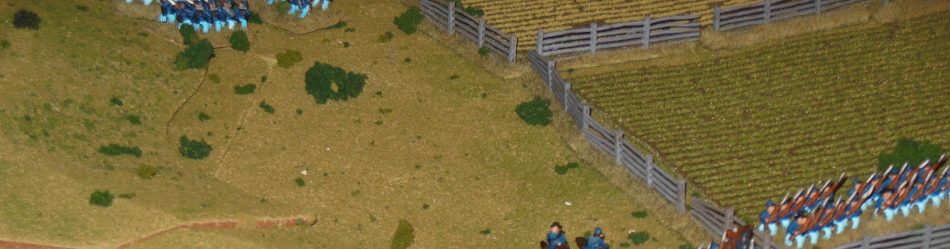
Confederate Cavalry reach Corinth turn 2

I use my brigades to march up road to Corinth
Expecting a battle for Corinth I marched up the road but the Union threw all their weight against the other flank and objective of the field and the hill overlooking it. Kon was marching through the grass at them.

I send a large infantry regiment down road to secure the hill.
Kon by turn 4 has reached the hilltop and the fence line for the field. The guns are unlimbering and looking to protect the Confederate left flank. Kon has made all the right moves and is ready for battle.

Confederate defenders deploy

Kon’s troops watching the Union cavalry
Ben sent his Union troops across the field and turn 4 became a big moment for the game so far.

Ben attacks across field

Kon rolls really well with almost all his units.
Kon’s patented no look rolling was great and did a great amount of damage to the Union forces coming across the field. It was not all one-sided as Rick brought up fresh troops and hit the left flank. Further, Rick sent his cavalry on a long run around the left flank to draw troops away. Kind of a force in being. The Confederate cavalry doing the exact same thing to the Union troops on the other side of the game board.
Kon did suffer a moral disappointment as his gunners fled the guns but they were not lost just pushed back. So by turn six more fighting was going on the left and I was moving up troops from Corinth to hold the hill and the fields.
At this time some critical things happened in the battle. Rick and Ben were able to attack again as Ben’s brigade commander came back. Ben lost a commander to fire from Kon on turn 4. (Ben has lost at least one commander a battle so far. You don’t want to lead troops under Ben.) I was set up to charge Ben’s infantry in the rear but he got the initiative roll and was able to make the command roll with his new commander. This allowed Ben to re-organize his troops to stop from being hit in the flank and attack Kon again.

Rick and Ben start another Union attack

Ben’s troops attack again across the field
Ben and Rick’s charged Kon’s troops and in most case’s made it in. We did not make it to the fire phase and melee before we had to shut down for the night. In the picture below you will see the Union trying to push the Confederate defenders back. Meanwhile I have lined up fresh units to attack Ben’s troops across the field on the other flank. The fire phase will be telling. Kon has Confederate troops under the trees on the far left side of the picture as well.

Union charge goes in

Fresh Confederate troops ready to attack
The battle has been going pretty well for the Confederate forces but we all decided it was not one-sided. The turn limit is not up yet and the Confederate’s will need to try to hold at least a little while. The Confederate commanders will need to decide if they want to try to hold or pull back. Having secured two objectives and inflicted more loses to the Union if the Confederate’s give up the field and keep the last two objectives just killing Union troops it could be a real victory. This is a decision that Kon and I will have to make tonight as we finish the battle. I for one am looking forward to it. May the rolls go in our favor. More on the end of the battle in my next post.

Very nice terrain!
All the credit for the terrain goes to Del Stover. He is the real terrain master in the club and puts money, time and effort into the terrain. He really is good at it and deserves all the credit. I don’t know what we would do without his great terrain. Del always presents great terrain especially at convention games. You can catch his terrain at Fall Inn, Cold Wars and Historicon every year. Thanks for the comment.
This table is really impressive, nice job!
Del is a master with terrain. I have to admit it adds to the experience having nice terrain. At least it adds to my experience. Some pictures of other terrain Del did is in a recent issue of Wargames Illustrated which has an article on Historicon 2014 games.